

Disable/Enable Windows Defender Permanently in Windows 10
[full_width]
Hey Guys we are back Again with a new Post on

As you all Know Windows Defender is the Best Anti Spyware program that Microsoft includes on every installation of Windows 10.
In some cases we need to disable Windows Defender for Some Reason
Something like if we are performing Penetration Testing with Exploits or Trojans ..
Windows Defender Detects it and Remove it From the System OR
If you prefer to use a third party anti malware app than you might want to disable Windows Defender

Defender will only stay inactive for a short period of time. When it detects that it’s been off for too long, it will automatically turn itself back ON again.
Step 1 :

On the right side of the window you might see a file called “DisableAntiSpyware.”

Step 4 :
Hey Guys we are back Again with a new Post on
How to permanently disable Windows Defender on Windows 10

As you all Know Windows Defender is the Best Anti Spyware program that Microsoft includes on every installation of Windows 10.
In some cases we need to disable Windows Defender for Some Reason
Something like if we are performing Penetration Testing with Exploits or Trojans ..
Windows Defender Detects it and Remove it From the System OR
If you prefer to use a third party anti malware app than you might want to disable Windows Defender
Windows 10 offers an option to disable Windows Defender, but it's a temporary
You can access it by going to “Settings, Update & Security,” then Windows Defender.

In this post we'll walk you through the steps to permanently disable Windows Defender using the Registry.
Step 1 :
Using the Registry
First, open the Run command by pressing the “Windows Key + R.” In the box that appears type
regedit and click OK.
Step 2 :
The system registry will open up. On the left navigate to the following folder :
HKEY_LOCAL_MACHINE > SOFTWARE > Policies > Microsoft > Windows Defender
You may see a folder after Windows Defender keep the Windows Defender one highlighted like the following image.

The system registry will open up. On the left navigate to the following folder :
HKEY_LOCAL_MACHINE > SOFTWARE > Policies > Microsoft > Windows Defender
You may see a folder after Windows Defender keep the Windows Defender one highlighted like the following image.

Step 3 :
On the right side of the window you might see a file called “DisableAntiSpyware.”
If you see the preference DisableAntiSpyware on the right double-click on it and set it to 1 to disable Windows Defender.
Step 4 :
If the preference does not exist, then we have to make our own.
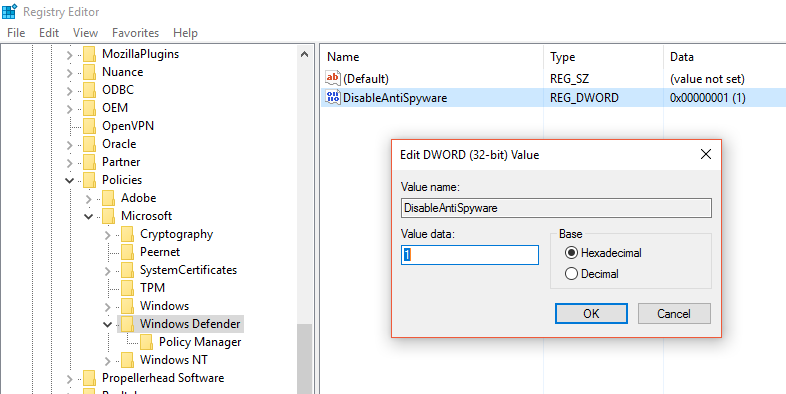
To do this, right-click in the empty space on the right side of the window, go to “New,” then “DWORD (32-bit) Value.”

Windows will create an untitled DWORD file. Rename the file to “DisableAntiSpyware.” Make sure you enter the name perfectly!

Step 6 :
Right-click the “DisableAntiSpyware” file and click “Modify…”
and set it to 1 to disable Windows Defender.
The next time you try to load Windows Defender, you’ll see the following error message saying it’s been turned off.


Step 5 :

Right-click the “DisableAntiSpyware” file and click “Modify…”
and set it to 1 to disable Windows Defender.
The next time you try to load Windows Defender, you’ll see the following error message saying it’s been turned off.

To Re-enable Defender
To restore Windows Defender at a later point in time, delete the key or set its value to 0.
Disable/Enable Windows Defender Permanently in Windows 10
 Reviewed by Haxbaba Tech
on
05:00
Rating:
Reviewed by Haxbaba Tech
on
05:00
Rating:
Reviewed by Haxbaba Tech
on
05:00
Rating:

![BruteForce WiFi Passwords using Android [NO_ROOT]](https://blogger.googleusercontent.com/img/b/R29vZ2xl/AVvXsEh_oxFngX3AcbPxWgJR0uhh6nReeVYSkcyCt4VYR-D4FrVgOeWaO5C83paW_iQwndTHT5THOCrSgG-FiA7IivMxdkOKU9DBNLlNANedSpqC6Spbf0Etnm2QnuarKxakB-u4M8zqtgAibvtH/s72-c/1280.jpg)


To avail an exclusive Webroot support, visit- Webroot Support Number
ReplyDeletewe also remove windows defender using gpedit in windows 10 read how remove windows defender using gpedit in windows 10
ReplyDeletegreat work buddy, But we also use gpedit to remove windows defender read how to remove windows defender
ReplyDeleteComplete protection for Windows 10 OS installed PCs to stay safe against all malware threats. Instant updates on the new and up-to-date virus definitions. The best windows 10 antivirus keep your system stay away from problems. Get complete protection for $4.99/year.
ReplyDeleteThank you so much for such a valuable information.
ReplyDeleteYou must read also, How to TURN-OFF Windows Defender in windows 10(2020 Edition)-->Turn-OFF Windows Defender in Windows 10(2020 Edition)